
John Doe
Monday, June 8, 2020 | 3 minutes
Configuring Projects Section
The purpose of the Projects section is to effectively showcase your projects. In this post, we will guide you on how to configure the Projects section on your site. For a complete reference, please refer to the sample projects.yaml file.
To begin, create a new file named projects.yaml in the data/en/sections directory of your website. Then, follow the instructions below.
Add Section Information
Add the following section metadata to your projects.yaml file:
# section information
section:
  name: Projects
  id: projects
  enable: true
  weight: 5
  showOnNavbar: true
  # Can optionally hide the title in sections
  # hideTitle: true
Add Project Filtering Buttons
Now, add a buttons section in your projects.yaml file as bellow,
buttons:
- name: All
  filter: "all"
- name: Professional
  filter: "professional"
- name: Academic
  filter: "academic"
- name: Hobby
  filter: "hobby"
Each button has two properties. The first property is name which is the text that will be displayed on the button and the other is filter which specifies the category of the projects this button should select.
A button will show only those projects that have a tag that matches the text specified in the filter filed. The filter value all is treated specially. It matches all the projects even though they don’t have all as a tag in their tags field.
Add Your Projects
Now, add your projects under the projects section of your projects.yaml file as bellow,
projects:
- name: Kubernetes
  logo: images/projects/kubernetes.png
  role: Contributor
  timeline: "March 2018 - Present"
  repo: https://github.com/kubernetes/kubernetes
  # url: ""
  summary: Production-Grade Container Scheduling and Management .
  tags: ["professional", "kubernetes", "cloud"]
You can specify the following field for a project,
- name: The name of the project.
- logo: The logo of the project. If the project does not have a logo, the theme will automatically add a placeholder there.
- role: Your role in the project.
- timeline: The timeline when you have worked on the project.
- repo: If the project is an open-source project and hosted on Github, you can provide the repository URL. This will be used to show the star count for the project.
- url: If the project is not an open-source project or not hosted on Github, you can provide an URL of the project. This will create a button with the link in the project card.
- summary: A short description of your project.
- tags: A list of tags for your project. It will be used to select the project under a category by the filtering buttons.
You can use markdown syntax in the
summaryfield.
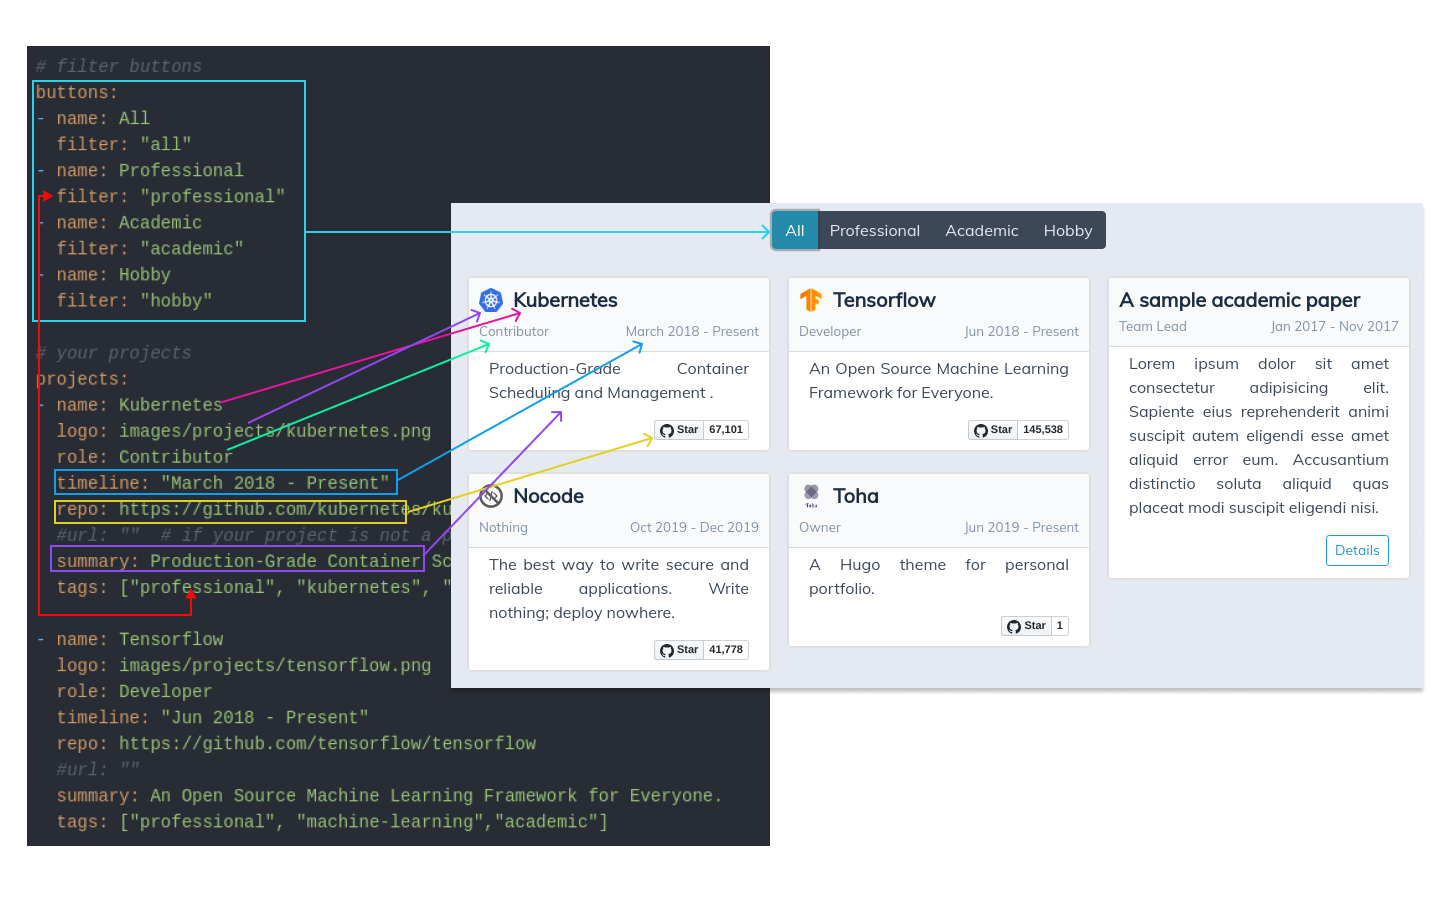
The following image shows how the contents of projects.yaml are mapped into the Projects section.
comments powered by Disqus