John Doe
Monday, June 8, 2020 | 4 minutes
Configuring About Section
The purpose of the About section is to provide a brief introduction about yourself on your website. In this post, we will guide you on how to configure the About section. For a complete reference, please check out the sample about.yaml file.
To get started, create an about.yaml file in the data/en/sections directory of your website. Then, follow the instructions below.
Add Section information
section:
  name: About # Title of section (default: "")
  id: about # url id/slug of section *Required*
  enable: true # Boolean to determine if this section is enabled (default: false)
  weight: 1 # Order to display section in (default: alphabetical followed by weight)
  showOnNavbar: true # Boolean to determine if a link should be shown for this section on the navbar
  template: sections/about.html # allows you to point to a specific template.
Template setting
You have the option to customize the partial used for this section by specifying the template property. Simply save the new template in your layout/partials directory.
Add Your Work Information
To include details about your current job, you can add the following section to your about.yaml file:
# your designation
designation: Software Engineer
# your company information
company:
  name: Example Co.
  url: "https://www.example.com"
Add a Summary About Yourself
To provide a concise overview of your professional expertise, let’s add a summary section. This will give viewers a quick glimpse into what you do. Add the following section to your about.yaml file:
# a summary about you
summary: 'I am a passionate software engineer with x years of working experience. I built OSS tools for [Kubernetes](https://kubernetes.io/) using GO. My tools help people to deploy their workloads in Kubernetes. Sometimes, I work on some fun projects such as writing a theme, etc.'
Try to make it as brief as possible. Don’t make it too wordy. We have other sections that give more insight into your expertise.
You can use markdown syntax in the
summaryfield.
Add Your Social Links
To add links to your various profiles such as LinkedIn, Twitter, and Github, include the following socialLinks section in your about.yaml file:
# your social links
# give as many as you want. use font-awesome for the icons.
socialLinks:
- name: Email
  icon: "fas fa-envelope"
  url: "example@gmail.com"

- name: Github
  icon: "fab fa-github"
  url: "https://www.github.com/example"

- name: Stackoverflow
  icon: "fab fa-stack-overflow"
  url: "#"

- name: LinkedIn
  icon: "fab fa-linkedin"
  url: "#"

- name: Twitter
  icon: "fab fa-twitter"
  url: "#"

- name: Facebook
  icon: "fab fa-facebook"
  url: "#"
You can use any Font Awesome free icons in the icon field.
Add a Resume
To add your resume, place the PDF file in files folder within the static directory. Then, include the following section in your about.yaml file:
# your resume. this file path should be relative to you "static" directory
resourceLinks:
- title: "My Resume"
  url: "files/resume.pdf"
Add badges
Now, let’s add your badges and a strength indicator for various soft skills such as leadership, communication, teamwork, etc. Include the following section in your about.yaml file:
# Show your badges
# You can show your verifiable certificates from https://www.credly.com.
# You can also show a circular bar indicating the level of expertise on a certain skill
badges:
- type: certification
  name: Certified Kubernetes Security Specialist
  url: "https://www.credly.com/org/the-linux-foundation/badge/exam-developer-certified-kubernetes-security-specialist"
  badge: "https://images.credly.com/size/680x680/images/f4bf92ed-8985-40b2-bc07-2f9308780854/kubernetes-security-specialist-logo-examdev.png"

- type: certification
  name: Istio and IBM Cloud Kubernetes Service
  url: "https://www.credly.com/org/the-linux-foundation/badge/exam-developer-certified-kubernetes-security-specialist"
  badge: "https://images.credly.com/size/680x680/images/8d34d489-84bf-4861-a4a0-9e9d68318c5c/Beyond_basics_of_Istio_on_Cloud_v2.png"

- type: certification
  name: Artificial Intelligence and Machine Learning
  url: "https://www.credly.com/org/grupo-bancolombia/badge/artificial-intelligence-and-machine-learning"
  badge: "https://images.credly.com/size/680x680/images/e027514f-9d07-4b29-862f-fe21a8aaebf1/ae.png"

- type: soft-skill-indicator
  name: Leadership
  percentage: 85
  color: blue

- type: soft-skill-indicator
  name: Team Work
  percentage: 90
  color: yellow

- type: soft-skill-indicator
  name: Hard Working
  percentage: 85
  color: orange
Currently, the skill percentage should be between 0 and 100 and should be divisible by 5. The following colors are available for skills percentage indicator,
- blue
- yellow
- pink
- green
You can also use any HEX color code in the
colorfield.
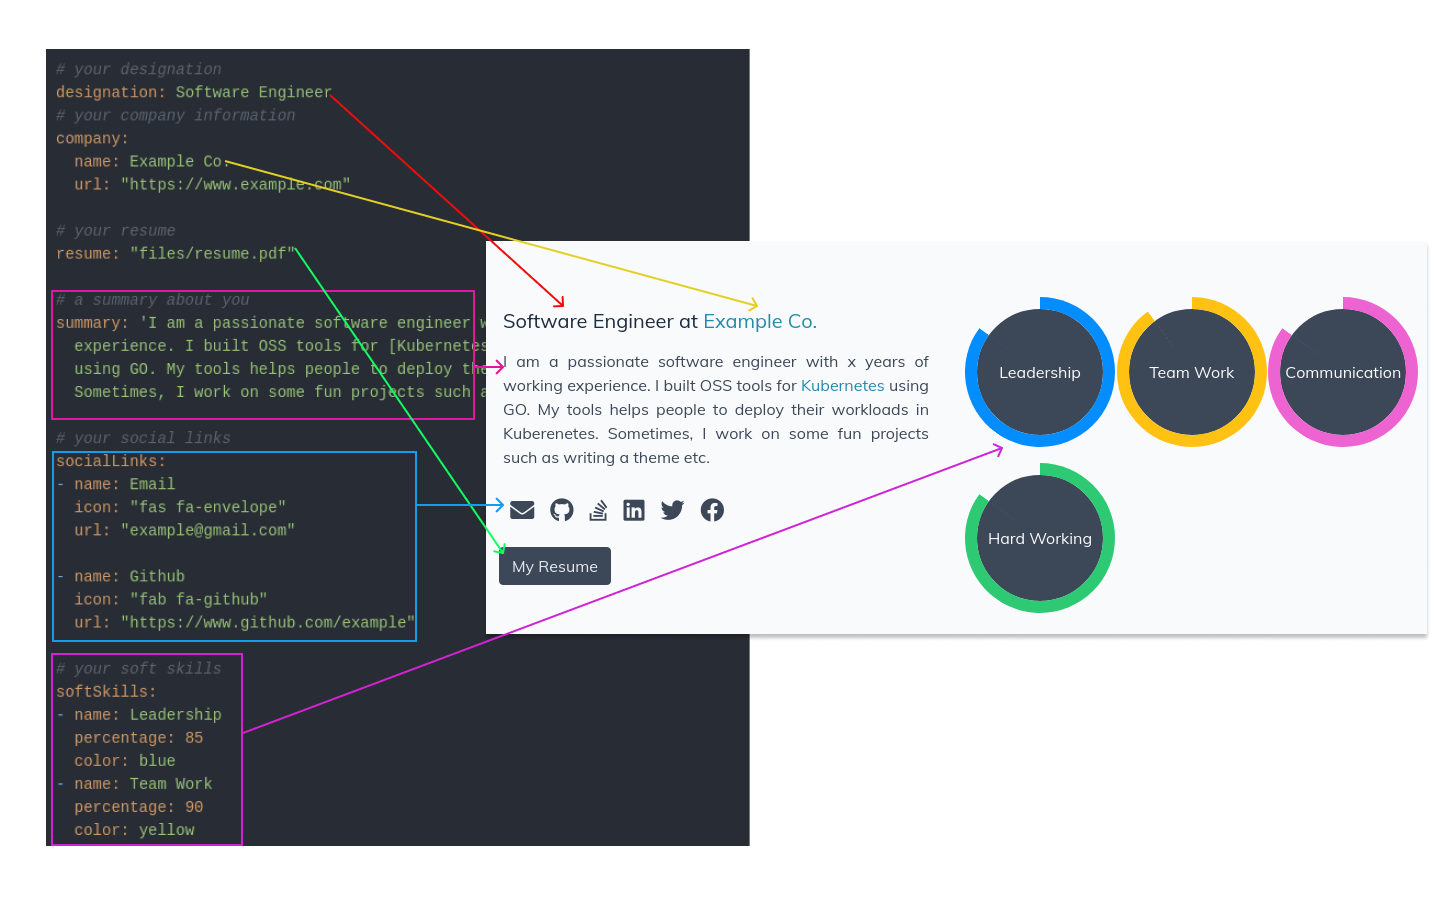
The following image shows how the contents of about.yaml are mapped into the About section. (The configuration portion of the image is outdated and softSkills section has been replaced with badges)